In top hammer drilling, the entire system is only as strong as its weakest link. The shank adapter (also known as a striking bar) plays the most critical role in the drill string assembly. It acts as the vital interface between the rock drill (drifter) piston and the drill rods.
Its primary job is twofold: transmitting immense impact energy and transferring rotational torque to the drill bit.
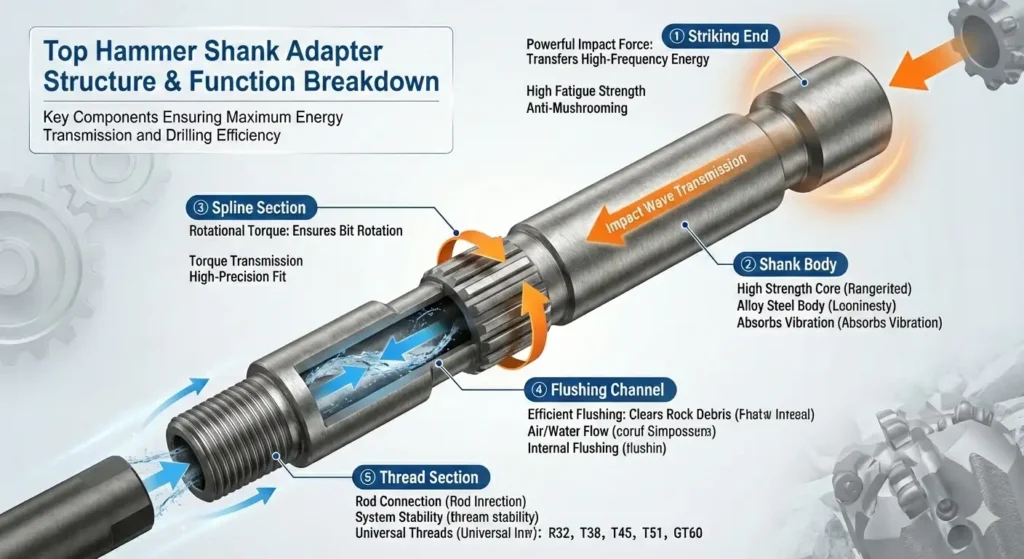
To understand how it achieves this under extreme conditions, we must break down its structure. A high-quality shank adapter is engineered into five distinct functional zones, each designed for a specific purpose.
Visualizing the Structure
Below is a breakdown of the key components ensuring maximum energy transmission and drilling efficiency in a standard top hammer shank adapter.

The Synergy of Structure and Function
| Structural Component | Primary Function | Key Value to Drilling |
|---|---|---|
| 1. Striking End | Receives impact from piston | High-efficiency energy transfer – maximizes hammer impact delivery to the bit for faster penetration |
| 2. Shank Body | Transmits shockwaves | Structural stability and toughness – withstands repeated high-frequency shocks and prevents premature failure |
| 3. Spline Section | Transmits rotation from chuck | Ensures effective rock breaking via torque – enables consistent rotation for cutting action and hole straightness |
| 4. Flushing Channel | Conveys air/water media | Optimized cuttings removal and cooling – clears debris efficiently, reduces bit overheating and improves ROP in abrasive conditions |
| 5. Thread Section | Connects to the drill rod | Ensures stable, compatible system connection – minimizes energy loss, prevents loosening or galling during long drilling cycles |
Function Breakdown by Component
Based on the structure above, here is a detailed analysis of how each section functions during drilling operations.
1. The Striking End (Impact Energy Transfer)
📍 Location: The topmost section that makes direct contact with the rock drill piston.
⚙️ Core Function: The Striking End is the “anvil” of the assembly. It receives high-frequency, high-velocity impacts from the drifter piston—often thousands of blows per minute. Its main job is to efficiently transfer this impact energy down into the drilling system.
🔧 Design & Manufacturing Key Features: Because it faces the most brutal punishment, this section requires extreme durability.
High Fatigue Strength:
Engineered to withstand millions of stress cycles without cracking.
Carburized Surface:
The surface is hardened (carburized) for wear resistance, while the core remains tough to absorb shock.
Anti-Mushrooming:
Designed with high resistance to deformation to prevent the end from flattening or “mushrooming” under constant impact.
2. The Shank Body (High-Strength Core)
📍 Location: The central, solid section of the adapter between the striking end and the splines.
⚙️ Core Function: The Shank Body acts as the primary energy conduit. It transmits the shockwave generated at the striking end down towards the drill rod. Crucially, it also absorbs a portion of the vibration to maintain overall structural stability.
🔧 Design & Manufacturing Key Features:
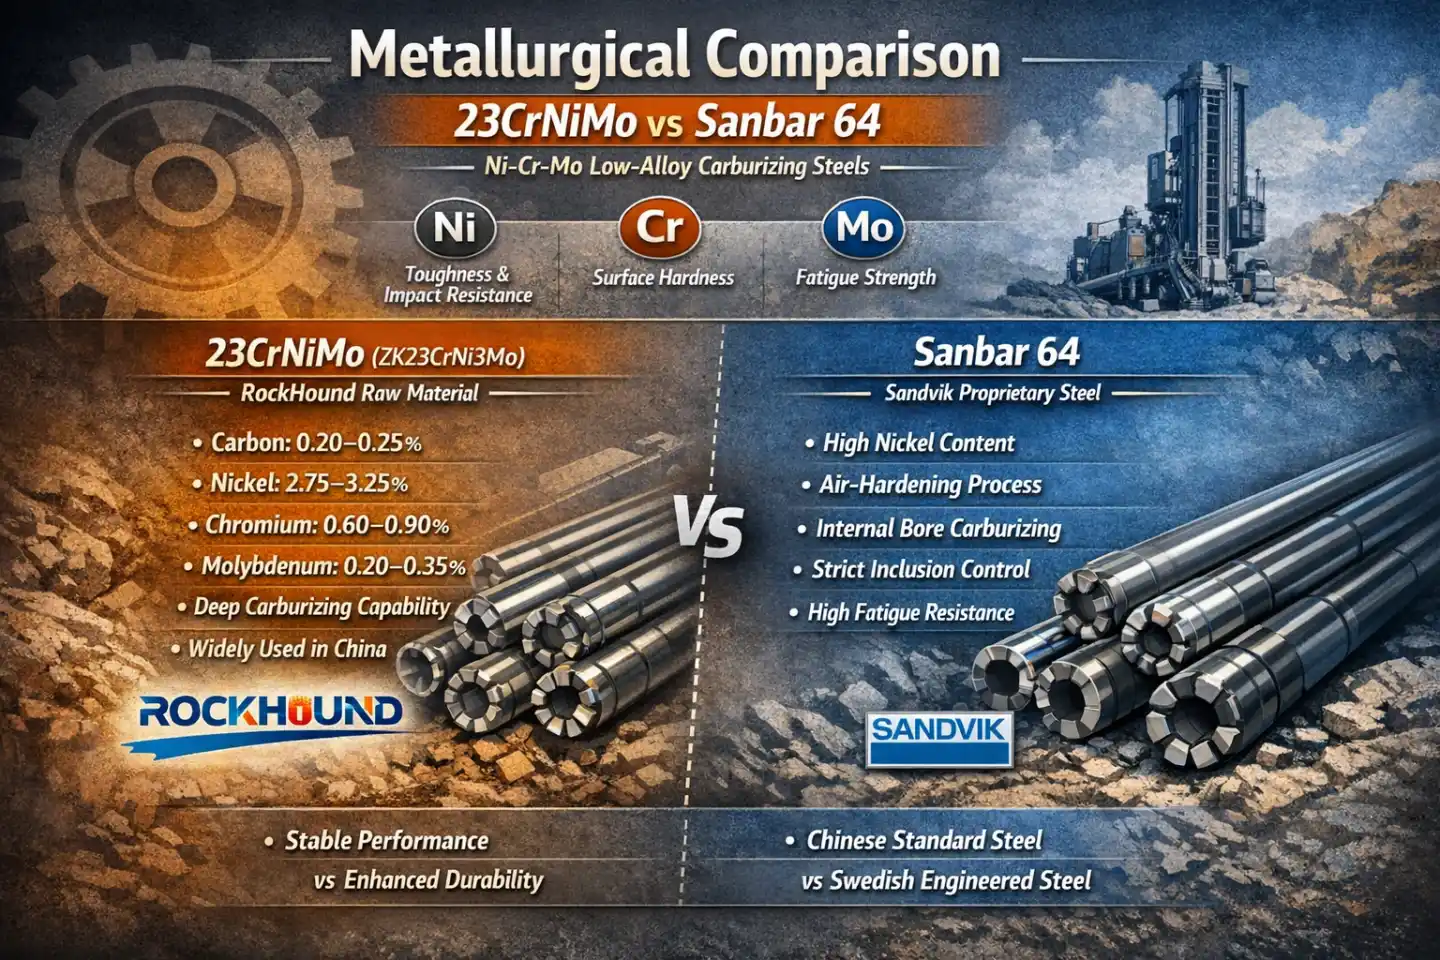
Premium Alloy Steel: Typically manufactured from high-grade carburizing steel (e.g., similar to ZK22CrNi3Mo grades) to ensure a perfect balance of a hard case and a ductile, tough core resistant to impact fractures.
3. The Spline Section (Torque Transmission)
📍 Location: The exterior section featuring machined grooves (splines).
⚙️ Core Function: While the striking end handles impact, the Spline Section handles rotation. These splines mesh perfectly with the drifter’s rotation chuck. As the chuck turns, the splines transfer that rotational torque to the shank adapter, and ultimately to the drill bit for rock breaking.
🔧 Design & Manufacturing Key Features:
Precise Fit:
High dimensional accuracy is essential for a perfect fit with the drifter to minimize play.
Wear Resistance:
The spline surfaces are hardened to resist wear caused by constant engagement and friction.
4. The Flushing Channel (Air/Water Flow)
📍 Location: The hollow bore running internally through the entire length of the shank adapter.
⚙️ Core Function: Effective drilling requires clearing rock cuttings immediately. The Flushing Channel serves as the conduit for flushing media (compressed air or water) to travel from the drifter, through the adapter and rods, to the bit face. This clears debris, prevents the bit from getting stuck, and cools the drilling tools.
🔧 Types:
Internal Flushing: The standard method where flushing media passes through the center of the shank.
5. The Thread Section (Rod Connection)
📍 Location: The bottom end of the shank adapter, featuring male or female threads.
⚙️ Core Function: This is the connection point to the rest of the drill string. The Thread Section must securely connect to the first drill rod, transmitting both the impact energy (from the striking end) and the torque (from the splines) down the line, while maintaining system stability.
🔧 Standard Specifications: To ensure compatibility across different rigs and rods, these threads come in universal standard sizes, including:
- R32
T38
T45
T51
- GT60
Choosing a shank adapter manufactured with precise attention to these structural details is essential for maximizing penetration rates and extending the service life of your entire drilling component inventory.